
The main stages to design a shop window and emphasize your products
"If Selfridges were a magazine, the windows would be the front cover" - Alannah Weston, Directrice Artistique Selfridges
1st stage : Choose a topic
The theme is the topic of the window presentation. It refers to a creative element that will be used to support the product.

The first thing to be done when you want to create a shop window is to choose and to define a subject which can correspond to a collection of clothes as to an idea-concept or a season of the calendar of the fashion. It is to find the idea which can make the difference: tell a story, evoke a subject, be inspired by artists...
The subject is a whole universe: he should include the color, the props, and the relevant merchandise that will make the overall idea come to life. We have to choose the good mannequins, the good accessories in order the windows to be realistic.
Themes examples : beach, swimwear, zoo, circus, Christmas day...
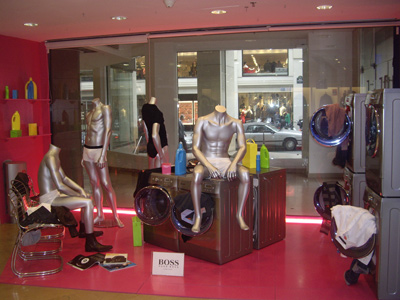
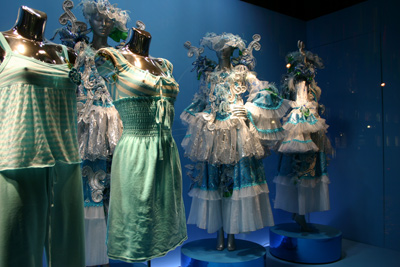
Shop Windows at Hugo Boss
Stage 2 : With which mannequins, furniture and objects are you going to emphasize your products?
How to choose the mannequins?
It deals with choosing if we want a small quantity of mannequins or a whole collection to renew the park.
We have to make an inventory of the mannequins that we have and to see if they are in good condition, useful several times or to refurbish. For example, it is necessary to pay attention on the fact that a sport and particular mannequin , even almost new, cannot be used in a shop window that is not dedicated to the sport.
The second question to arise is: what mannequins’ kind I need? Stylized, realistic, headless, children, women, men busts?
- stylised mannequins = They do not require make-up, nor renovation of make-up and are useful much more often, in larger number and for more themes than the realistic one.
- realistic mannequins= They give to the shop window a credibility and a humanity in the stage setting of its products. Be careful, the clothing of such a mannequin is more complicated as far as there is a wig to be well settled and a particular make-up.
- Busts = busts are generally used in the more classic shops of ready-to-wear clothing, notably busts cloth as our bust
Then we have to choose the positions of the mannequins (more choices in the realistic ones) : positions which match each other: a male mannequin should match with a woman, or a man with a kid...
Moreover, positions should correspond to the props. If we have a table, we need a mannequin that can sit down the table for example.
What sort of objetcs can we introduce in a shop window?
"Props" are objects that visually support the items for sale. Thanks to their form, colour, caracteristics, they enhance a window. A prop can have empathy with the products, or cleverly have nothing in common with the merchandise at all.
Examples of "props" : photo, painting, animal, flowers that are an effective way to promote a specific season or a specific subject.
Be careful ! "Props" shouldn’t overpower yet still support the product. Il ne faut donc pas insérer trop d’objets ni de mobilier.
A rule : 2/3 maximum props to 1/3 merchandise is usually the best. Because too much merchandise can interfere with the artistic composition of a shop window.
However, during clearance sale and promotions, when the aim is to focus on the reduction message, it’s not uncommon to see a window with a lot of merchandise and no props.
3rd stage : Design a scheme of a window
The focal point
Large or small, a window needs to have a focal point on which, when viewed from the street, the eye will instinctively rest.
The focal point is best placed just below eye level, just off-centre. The eye may be guided around the window display to other products.
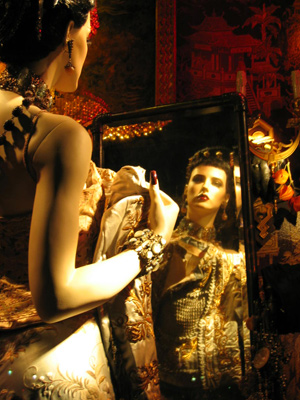
On the photo above, the focal point os located in the mirror between the hand of the mannequin and the mouth in the reflection.
Colours
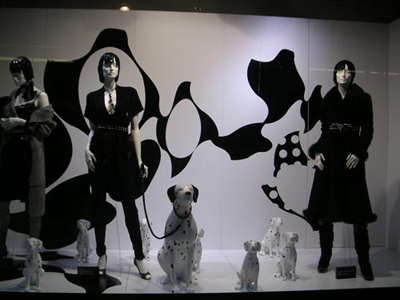
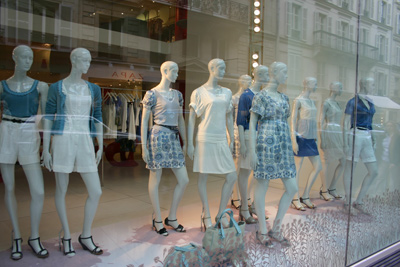
Blue trends at Printemps - Black and white Trends in London
To choose one or several colours for a shop window, we need to know which one matches with another and which ones represents such or such thing. Colours represent different symbols according to the cultures and thus have a strong impact.
For a shop window, the colour has to correspond to the topic (red and green shop window for Christmas, yellow and orange for the summer).
Commonly! One of the most effective window schemes that has been used by visual merchandisers worldwide is the use of only one colour. Various shades of the same colour used in the same display can create impact. A window based on the colour blue, as the photo above, can add emotional value ; it coulb be perceived as cold, sad...
Other technic : complementary colours --> choose 2 colours that are directly opposite each other on the colour wheel (fo example : purple and yellow or blanck and white)
Colours promote a trend, they are very important for the scheme and theme of the shop window. This is the most magnificient tool for capturing the attention of passers-y and creating atmosphere.
Craftinesses and tricks : There are tricks you can use to change the look of a window. A darker colour such as blak will make a larger window appear smaller. White on the other hand will create the effect of space
Lighting
The light is one of tools of products and mannequins’ development. Lighting used in a daytime can differ from the amount needed at night. In a bright window with the sun shining on it, more light will be required to compensate for the extra light. Less lighting, as strange as it may seem, is required at night beacuse the windows will stand out against their dark surroundings.
Many retailers have adopted a system that can automatically adjust the lighting outputs, depending on the time of the day.
Stage 4 : How to order of the mannequins? How to fit out the window?
There are 2 styles of grouping : repetition and pyramid grouping
The repetition
Repetition grouping is an interesting way of arranging products. I deals with arranging mannequins and props in order to have a repetition effect and a clean impression. This way to dispose mannequins is not as simple as it seems. It is easy to lose the focal point within a window with repetition.
See the photos as examples
Trick !! To arrange a multitude of identical mannequins in simple positions has numerous advantages. The shop window is quickly made and this is not expensive. The mannequins which have standard positions are cheaper than original positions. And often, the simple shop windows are the most beautiful.
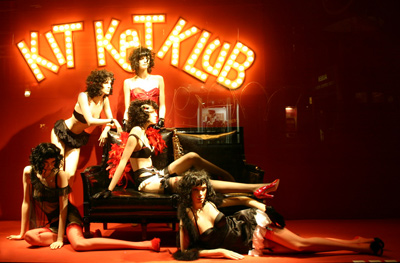
The Pyramid
The rule is simple: gathering and grouping the mannequins and the props together and in a same place (often center of the shop window or, if there are several groups, they are spread in the whole shop window).
This system enables the eye to remain for longer on the key produtc that is being emphasized. Usually, a mannequin placed in the center is heightened and the others surround him.
Below : The centre mannequin is elevated by positionning her on a sofa and our eyes are focusing on it. The other mannequins are the pyramid : it enables the eye to remain for longer on the key product that is being emphasized.
To put in a nutshell ...
Understanding the theme and the concept which were chosen for the window
Making a plan and schemes for ordering the window, without props and mannequins
Purchasing the mannequins : positions, style (stylised, realistic...)
Considering the "props" to suuport the items for sale
Arranging, layong out the window : giving a visual guidance to draw attention to the store